Wednesday, February 6, 2013

Starting the Seedlings...and getting sprouts on the third day!

It's time to start our seedlings indoors! For the first year in Oklahoma we are trying to be thrifty as possible. My son is cutting milk jugs. 

They serve a multi purpose. The bottom can be used for trays and the tops for 'mini-greenhouses' for the garden.

My son modeling empty bottles to use in our pots at the bottom instead of rocks. They weigh less!

My son models the keurig cups we reuse (I have another post about that). 

You can fill each milk jug bottom with 6-7 cups.

This year I am using Jiffy seed starting mix that is organic. I found it has the lowest salt content. 

We fill them and place them in the container.

We have lots of help this year!

I then look to see how long it will take for everything to germinate. Some take 20 days so those I want to start now. You try to time it with the last day of frost. But with my daffodils blooming, I can start these seedlings if I make sure to cover them when I transplant them.

I then name the side of the trays (I also reuse egg containers but they absorb water so make sure these seeds do not dry out).

I saturate the soil in each cup.

We then take a pen and poke holes down depending on the depth each seed will need to germinate.

I then place each seed in and cover lightly.


I then place plastic wrap over each container. I use 'packing tape' and tape it to the side. Egg cartons don't stick as well once wet but they still work.

I do one last spray mist over the seeds.

I cover and on this side I actually fold the tape over.

That way you can pull it back when watering. 

Here I show the seeds covered.
Make sure to use a piece of packing tape to secure any unused seeds.

Now to the lights...:) I put a piece of foil down and place christmas lights over each one. This creates a warming effect from below which warms up the soil.


I then use a tote topper to place over the lights and place the egg cartons on top. Remember those containers absorb water so they will be very moist and you do not want to get water on the lights. 

This is my son helping the assembly line by placing seeds at the approximate depth.

We also label each container with the seed's contents. I am showing the milk jug version.


If you have seeds that need to soak, soak them and keep them out so you don't forget about them. Have their trays ready to go.

The milk jug bottoms can be laid directly on the lights. Just make sure no water gets on the lights. 

This is marigolds on day three! Once they start to grow, please remove the covering so they have room to grow up. You will need to keep the room well ventilated by running a small fan on the seedlings to discourage mildew growth and to strengthen young plants for transplanting them outside.


Saturday, February 2, 2013

A beautiful sight

Goodmorning fellow readers. Last night while I was checking the fences in the horse pasture I noticed a beautiful sight, yellow flowers! This year will be a year of exploration on our property, since this is our first year in Oklahoma. I was so overwhelmed with joy at the sight of these guys, I went back to the area where they were and weeded the large, tall 'weeds' that my husband will have to spray from the ten years of neglect the property has taken.

As my dogs laid down to rest, I took to pulling the 'weeds'. I discovered not just a small cluster of bulbs but they stretched quite a large area. They no doubt were probably planted and multiplied throughout the years. 


I have daffodils...I think. :) I am hoping that a couple of you 'plant enthusiasts' can identify exactly what I have. They are approximately 6-7 inches tall. Please comment below! I am excited to know what treasure I truly have.

Well enough of the flowers, it's back to work dogs in the cattle pastures! Here are L-R: Boomer, Danno, and Alley keeping a protective barrier between myself and the cattle. I love these guys.
Ed or Gin (as in Gin/tonic) is our border collie, he has a split personality and only answers to one of the two names each day, it's your job to figure out who he is. I don't know where Lola was hiding in all the pictures but somehow she must have been camera shy so I'll snap her next time. 

So I came back today to show an updated picture of my tulips. :) 

It was funny cause my friends said, my cowboy doesn't have to buy me flowers because he got me a whole field of flowers that pop each year. 


Friday, February 1, 2013

Branding in 2011

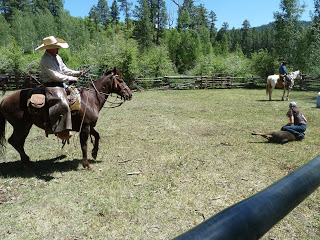
In 2011 we took these pictures of our branding. Each year we gather our cattle and sort off the calves from their mothers (sometimes we keep them together) and we rope, brand, vaccinate, dehorn, and castrate (remove the balls). Phew such a lot for such a little cow but they handle it well.

My husband taking a rest amongst the aspen trees as we moved cattle several weeks before the branding.

A bunch of our friends watching riders rope calves.

Here is our friend, Twine, with a calf roped and I am holding it down for the brand.

And I am still holding. :) 


My husband is to the right of me. 

Our mother cows.

My cowboy's parents restored a chuckwagon and cooked us a very tasty meal for everyone who came. Even people we didn't even know. :) 

My little girl pausing for a bottle and giving momma a break from the cows.

Repaint a store bought sign

My little toddler loves horses. Her room is brown and purple. I decided to get this for her and since it didn't match her room, I repainted the sign. I used sample colors from her burlap sign project and while my son did homework, I painted away. The sign was black with a red heart.

I applied the first coat and then a second coat since we were painting over such a dark sign. I then repainted the heart in a different shade of purple. I opted to keep the little horses underneath so I just painted around them. 
I put it under an old chandelier that I had when I was in college. I hung it the same day so I have yet to hide the chord. On my to do list. (It keeps getting larger!)

Happy repainting!


No sew curtains and natural wooden rod

For my no-sew curtains, I bought two- three yards of fabric. It was less expensive to buy them from walmart by doing two-three yards of fabric rather than one six yard of fabric. I knew I would be using the fabric to make two panels so it wasn't painful to have it broken up. I used liquid stitch on the fabric.
I placed the fabric on a huge working surface, in this case, my floor. 


I placed a paper towel under where I would be making the fold with glue. I drizzled a small portion in a straight line where I wanted to make the crease. I then used a q-tip to make an even swipe down the line to even out the glue. Work quickly because the glue dries fast. I folded and bonded the sides of the panels first.

Once the sides were done I worked on the top. I folded and glued a small flap over to secure the ends similar to the sides.

Next I folded over the top. I made a seven inch fold from top to end of fold. This picture shows the glue  on the inside of the fold, which I smoothed out with a q-tip. 

I then made sure the fold was secure and pressed down. This picture shows the top, completed on the side. We have plenty of room to find a branch to fit through. 

I measured my window sill from the bottom of where I would be hanging the wooden rod and the bottom of the floor, which measured 87 inches. I cut at 89 inches to allow a two inch fold at the bottom. I then glued and secured the bottom at 87 inches, the desired length.

I ironed both panels going all the way to the edge. 

We have many branches like this around our property. We use them for stays in our fence. ((For all you ranchers I will be posting 'how to' on 'ranch stuff' in the future.)

I used my handy black and decker battery saw (since my husband thinks I will cut my leg off with a real one) and chopped off the top. I was going to keep the top but...it didn't fit in her room. 

I put the panels on the rod and screwed the rod into a stud. (use a stud finder, do not guess)
Lucile playing with the old 'rod' in her room.

The result are two panels. I will be making burlap tie backs in the future.