Monday, August 5, 2013

Crape Myrtle Cuttings

I kept driving by my neighbors house and admiring their Crape Myrtle's. 
I love the color and the bark of these fabulous tree. I just had to get them! So I pulled up one day and introduced myself and asked if I could get some cuttings. 

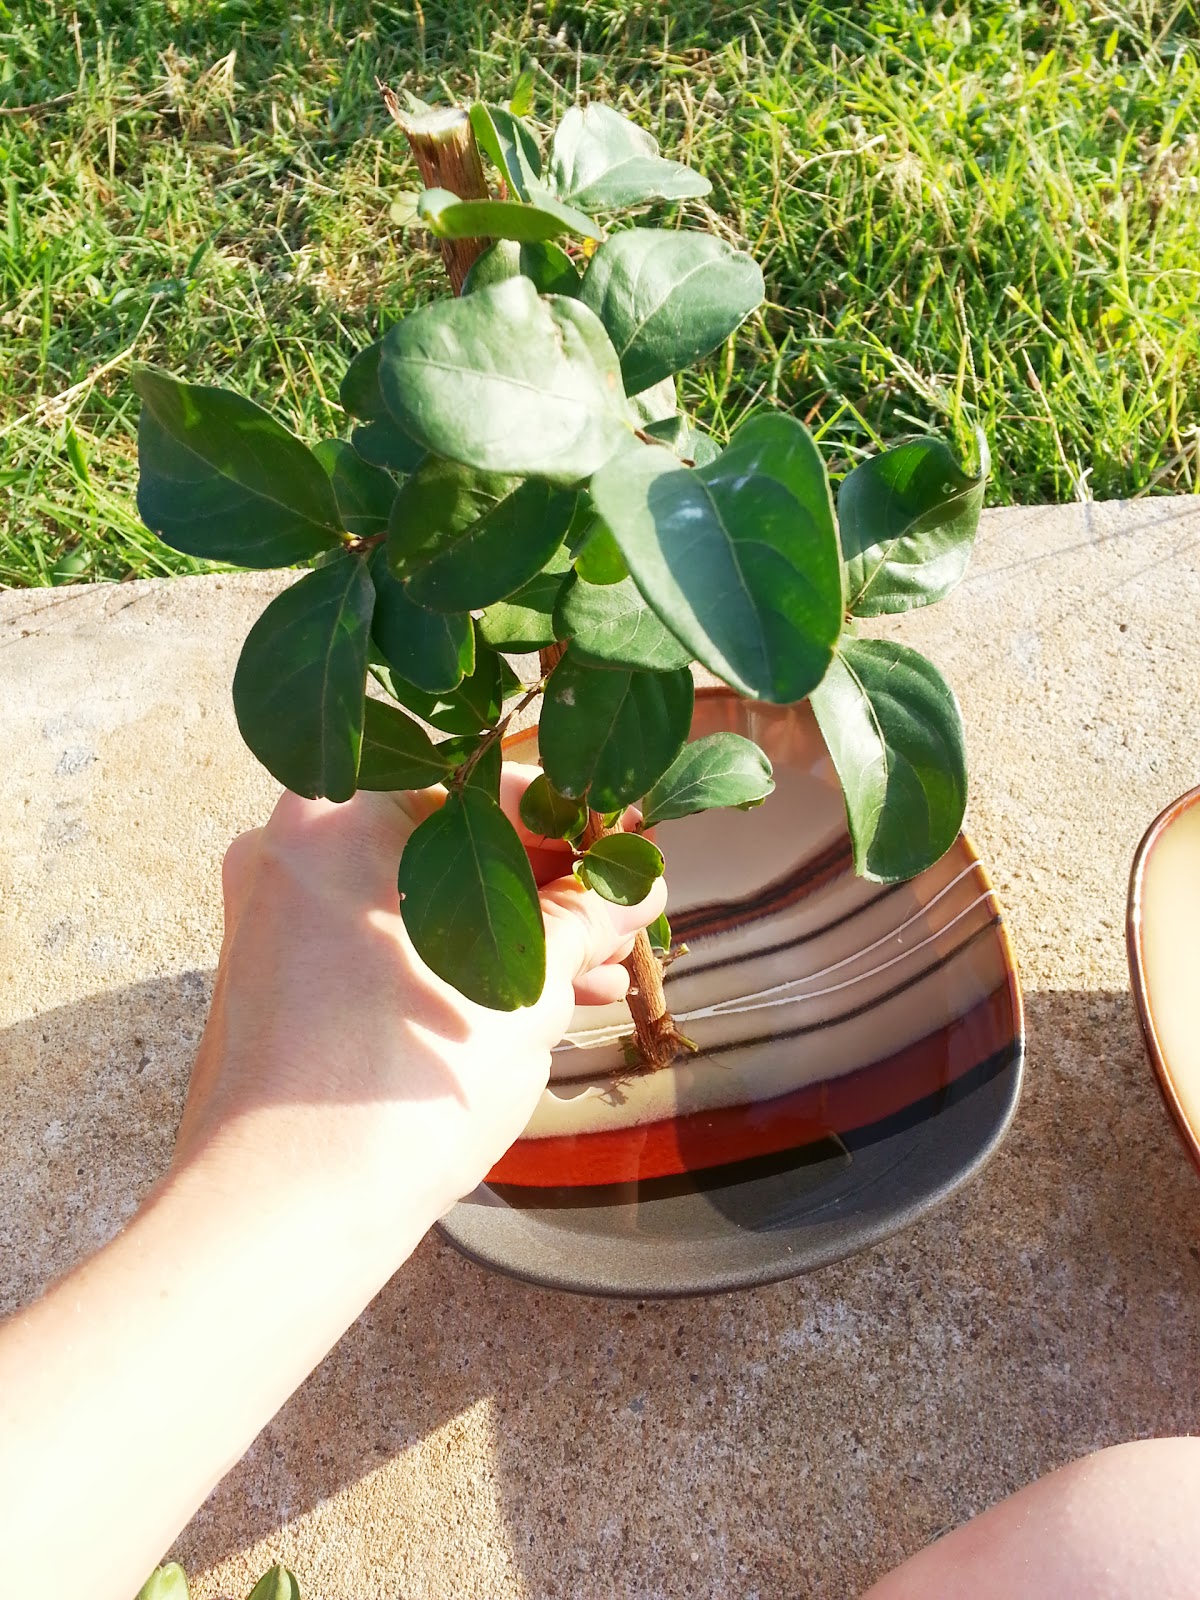
The result was successful! They cut these straight from the bottom. You need to be able to bend the new growth, if it doesn't break, you have new growth which is perfect for cuttings!
I just saved so much money not having to go to a nursery! 
You first start out by lining a pot with a coffee filter. This works two ways, it helps your excess water to drain and it also retains some of the moisture needed for cuttings.

Fill the pot with dirt, in our case, some Oklahoma Red Dirt! Water completely. 

Bust out your cinnamon. 


Cinnamon is a natural root hormone. 

For transport, one or two large gallon plastic baggies with wet paper towels will keep them happy until you can cut them and give them a new home.

I wanted to use my largest cutting to show that you need to take off all of the leaves on the bottom part of the branches. I had several large limbs, I took many cuttings off one branch. Then I cut off the leaves on the bottom, keeping the leaves on top cut back if they are long.

Dip all of your cuttings into water.

Dip them in cinnamon.

Poke a hole in the wet dirt with a stick or pencil. Then put your crape myrtle in the soil and secure the soil around the cutting.

I did several sizes of crape myrtle and we'll see which ones survive. Keep your soil damp, not soaked, not dry. The roots will take place and you can transplant them into the ground when they have established one new 'limb'. Do not try tugging on your cutting, you could damage your newly formed roots that way! Don't transplant during super hot times. (I won't be transplanting till the fall).  Keep outside, but keep it protected from direct sunlight until it's a little more established. My back porch works great, receiving light but not drying out! 


Friday, August 2, 2013

Influenster Mary Kay Project


I am an influenster! The product that I am reviewing today is Mary Kay! I honestly have never used Mary Kay before this came in my mail. To my absolute delight I received this in the mail for free! 

Did I mention that I LOVE being an Influenster!? 


Here is my non-makeup look! 


Here I used Mary Kay's primer for eyelashes and mascara! This is my daytime look. I work on a ranch! So I apply sunscreen on first and then apply mascara only if I know I am not going to be sweating outside all day! I love the length that Mary Kay mascara took my lashes to! A friend of mine has been putting on fake eyelashes on each individual eyelash and mine looked like her $70 buck eyelash extension without the money put in it! Mine won't last two weeks, like hers, but just think of the amount of money I could save with Mary Kay and still have the glamourous look! I applied a non-Mary Kay lip plumper for this shot.


For my evening look I applied Mary Kay's liquid eye shadow. Mine came in purple and it was absolutely a treat. You can blend it evenly without clumping. The brush that I received did a fantastic job of creating the night time look I was hoping to achieve. 
I put on a non-Mary Kay eyeliner and lip gloss to complete my look. 

Thank you Mary Kay for having amazing product that was a true delight to use! I look forward to many more beautiful days thanks to your product!

Bzz Agent Autumn Reporting

I belong to a nifty little society online called Bzzagent.com! You receive product for free to test it out and then deliver your honest opinion of what the product actually does or doesn't do!

In my latest kit:
The Lysol Power & Free claims that it can clean without the harshness of bleach. It uses peroxide to kill 99.9% of the germs. Perhaps they keep the .1 percent alive so they can keep their job security. :)

They claim that you don't have to open windows or drive out the children because it is safe to use.

This is what I received for free! Two full size bottles of the Lysol Power & Free Spray and Wipe. 
I honestly have to admit. I hate the wipes. The durability of the wipe is amazing. It will last through a bunch of scrubbing but I couldn't clean off my entire table in this picture without running the wipe dry. I ended up putting water on it just to re-moisten it. How effective was my germ killing power after I re-moistened it? Probably 70%? Yikes. Don't bother getting the wipes.

The spray was another story. The spray was amazing on windows and glass. It worked better than my own regular mix (consisting of vinegar and a smidgin of water). There was no streaks on my glass or mirrors. :) It also polished all my appliances and stainless steel amazing! I used the bottom of our shower to show the power of the peroxide. When I sprayed the bottom of my grimy shower, you could actually see the hydrogen peroxide bubbles hard at work. 

This was the result of the bottom of my tub. I used this because we have hard water stains. I was HOPING that it would take them up. But it didn't....back to the bar keepers friend. :) But...I think I might switch my window cleaner out for some Amazing Lysol Power and Free. 


Sunday, July 28, 2013

Okie Suds

What do you do when you have no time on your hands? You create something else! I have just launched www.okiesuds.com . I wanted to make a soap for the environmentally conscious person as well as the wild girl at heart! For example my Rosemary Mint is wrapped in zebra and hot pink tissue paper! This is my new, handmade soap that you can purchase for five dollars a bar.

It's OK to go WILD with soap!

All soap is now in the curing phases and will not be available until August to my amazing customers but you can still pre-order your soap today.

Check out some of these amazing pictures and ...did I mention... My house smells amazing?
Okie Suds is also on Facebook at www.facebook.com/okiesuds and on Twitter www.twitter.com/okiesuds. I will be doing some promotional giveaways throughout the year so like my page and check back often as we are always creating!


Tuesday, July 23, 2013

Drip Irrigation on a budget

:) As I promised one of my nurse friends...I would show you how to make a drip irrigation system for under fifty dollars. I won't lie...this is not my idea. I stole it off of a guy on pinterest. But...I did make some mistakes and some "What the heck?" errors along the way, including taking pictures and upon transfer to my computer, yup...you guessed it..they got deleted. So... Let's wing this post!

First things first..Let's give ya a link to the original post where I was inspired by the inexpensive drip irrigation system. Link If you want to do the Martha Stewart version check that out! They have a filter, fancy hook in system (that I could never find) and other amazing things! But this isn't a blog for the perfectionist! :) tee hee.. this is a blog for the practical minded. Plus by knocking off some of the extras, your costs go way down!


This picture shows my main line out of the ground with the attachment to hook up to a garden hose. How easy is that? Just hook up and turn on for underground watering. Of course you can cut it closer or do it fancy....This works for me since I don't have to actually go into my garden to hook it up.

I went to Sprinkler warehouse  and bought my large main line which ended up doing a U shape through my six beds. This is a non-drip line. I didn't know it at the time that I had also purchased NON-DRIP poly tubing for the 1/4 inch sides off of the main line. So I had a system that didn't drip anywhere when turned on! ((yes not my finest moments)). I ended up fixing that with a wonderful needle and I poked holes throughout the main line and the side lines. I kinda got carried away since I didn't know what needed to drip and what needed to not drip! Side lines, yes...main line NO!

Here you can see the main line and the two side lines that I put on each side. 

This is my son helping bury the lines. BTW...bury the lines deep, almost three to four times deeper than you think because....well, you'll end up weeding them up if they get attached to a weed. Or like me...thinking I could hoe it...lol...I didn't cut a line, just ripped it up and had a time burying it in between produce coming up!

This is the Drip irrigation going...you can see all the water and how it just streams out. I never bought a fancy slow flow...or a filter. If you think your water is super gunky, then by all means do that! But your cost will go up! I bought a filter and slow flow and it ended up just leaking horribly! I threw it away.

So this is what you need:
-Main line (non-drip) 1/2 inch
-T's (I think I used a total of six (for my six beds) and I still have a bag full, I never used the single ones but if your bed is wide, purchase these too)
-You can use a small knife to cut the hole instead of a fancy tool but the tool was super cheap so I bought it! 
-Buy Electrical Tape to clamp off the end of the Main Line and the small lines, one roll
-Side lines 1/4 inch(make sure these are drip-lol)
-The end that attaches to a hose found in my first picture for the 1/2 inch main line, it screws in and doesn't leak (you can purchase them at your local Lowes) I never could find that piece anywhere on the sprinkler's website!

Determine how much you'll need:
Find out how big your beds are by putting a rope or string down along where the main line and side lines are and that's how much you'll need. Make sure you write down these lines cause you'll need to cut your side lines to length. Of course it comes in giant rolls of 100ft. If you have leftover, rock on, you can use it along another area of your garden.

What I wished I had known:
-Side lines were drip
-I wish I woulda put a third side line down the Main Line that was a 'drip' line. That way I'd have a total of three lines (because my beds are so wide). 
-I woulda kept the main line intact without puncturing it. As you can see from the pictures, the force is heavy and if the beds are fluffy soil, it will quickly shoot out of the bed and create a puddle if you have the pressure up which will ruin the bed! 
-I wish I wouldn't have bought the wasted filter and slow flow applicator. It did nothing but leak.
-Lowes has an ENTIRE section on sprinklers and the prices were not bad! You might even compare with sprinkler warehouse before purchasing!

Total time was about an 2 hours ...the longest part was digging so if you order your stuff online, go out and dig to save time once it all comes in! 

Happy irrigating on a budget!


Monday, July 15, 2013

Our Ferro Cat and the Neater Feeder

I wanted to share a very special story about our cat, Coal. He was purchased for twenty dollars at our humane society back in Colorado.  I had a mouse and chipmunk problem back home in the barn. I needed a mouser. When the lady went to put him in the cage she literally threw him in since he was so wild. They told me to leave him in the cage for a week to acclimate the cat to his new surroundings. After the second day I gave him some tuna and kept the cage open. I didn't see him for two weeks. I kept his bowl full of cat food which im sure the chipmunks loved. The strangest thing began happening with Coal. I saw him in a yard one morning. The sightings became more frequent. He began eating from his dish and slowly warmed up to my two year old. Perhaps it was her small size but Coal began hanging out. In addition his job description began to be fulfilled.  He was a little mouser.

I shared this story with Neater Feeder during one of their giveaways. My number was pulled and we were able to get one. The delivery was fast and prompt with no problems. In addition Coal can now reach his food at a comfortable height. The Neater feeder promotes a tidy spill area designed especially for a clean space. If my toddler hit the previous feeder food cascaded along our back porch. The water would mix in with the food and it was a mess. 

Using it roughly a week I have notice no spills on our deck. The food catches in an easy to clean tray below. The design allows my cat to eat at a more natural position and it is stylish with two silver bowls inside their feeder. My bowls are medium size and the feeder is for a cat. They come in two colors and multiple sizes all the way up to a large dog. This would be perfect for an eager puppy who goes wild during feeding or an older dog to aid in digestion. 

The price is also amazing! Click here for their website!  Btw I was not paid for this speal. I won their product off their promotion.  But it was perfect for Coal, my domestic-ferro cat. Have a rescue story? Post it below! I'd love to hear about your extended family!

Monday, July 1, 2013

Our final arrival for the year from Ruby

Our last arrival of horses made her grand debut. We have a little filly from Ruby. That makes two colts (boys) and one filly (girl). So now we have a total of eleven horses. :) You can see the afterbirth still attached to Ruby. The little girl was minutes born.


This little filly has a star on her head and white socks. Very beautiful markings.

We also found this snake lounging by the water hose. We don't know if it is a copperhead or just a boring snake. We chose not to investigate. 

My daughter took care of her calf.


And let me know she can be a cowgirl princess using daddies boots, hat, n rope. I hope you all had a great June! Happy fourth to all!